3. Running

When running any of the commands in the remaining sections of this document, make sure the shell environment has first been set by running the following command.

source PATH_TO_SOURCE/devel/setup.bash

As before, replace PATH_TO_SOURCE with the name of the directory in which the ROS driver is installed.

3.1. Starting the Driver

Before running the ROS driver, make sure the MultiSense S21 is powered. The RJ45 end of the MultiSense S21 developer’s cable should be plugged into the network port of the machine running the driver.

The next step is to configure the network. The multisense_bringup package contains an example configuration script called configureNetwork.sh. Because the NetworkManager daemon may override the settings from configureNetwork.sh, it is advisable to stop this daemon before running configureNetwork.sh. The script then changes the IP address of the host machine to 10.66.171.20 and configures other network parameters to communicate with the as-shipped MultiSense S21.

sudo stop network-manager
sudo PATH_TO_SOURCE/multisense/multisense_bringup/configureNetwork.sh

Note that use of our script is not required. You can manually change the computer IP to the MultiSense subnet, or change the MultiSense IP to a unused one on your subnet. But, you must still run the important parts of the the configure network script:

echo 16777215 > /proc/sys/net/core/rmem_max
echo 16777215 > /proc/sys/net/core/wmem_max
ifconfig eth0 mtu 7200

With the network interface configured, the ROS driver can be launched:

roslaunch multisense_bringup multisense.launch

This will connect to the MultiSense S21 using the default IP address and MTU (10.66.171.21, and 7200, respectively.) If the MultiSense S21 has been configured to use a different IP address, or if a different MTU is desired, the change can be specified with a command line argument:

roslaunch multisense_bringup multisense.launch ip_address:="10.66.171.14" mtu:="9000"

3.2. Namespacing

The MultiSense ROS driver supports individual namespacing of driver instances. This feature allows for multiple MultiSense units to be run on the same machine without any conflicts. The namespace of a particular MultiSense ROS driver instance can be changed by specifying the namespace parameter when launching the driver:

roslaunch multisense_bringup multisense.launch namespace:="multisense_1"

This starts the MultiSense driver with a namespace of /multisense_1.

Changing the namespace of a MultiSense ROS driver instance appends all the topic and transform names with the new namespace. The default namespace of a MultiSense driver instance is /multisense. The following documentation assumes the default namespace when describing transforms, topics, and the dynamic reconfigure interface.

3.3. Robot Model

The MultiSense ROS driver supports ROS robot models for various MultiSense sensor types. The launch file sensor parameter loads a specific robot model and corresponding URDF.

roslaunch multisense_bringup multisense.launch sensor:="{VARIANT}"

The above command starts the MultiSense driver using the MultiSense S21 URDF model, loading only the transforms applicable to a particular sensor configuration. Currently the SL, S21, S7, S7S, and S27 sensor parameters are supported. If no sensor parameter is specified, then the default parameter is SL is used.

As of ROS Driver version 4.0.0, the driver includes standalone and importable URDF models via xacros. To use the importable URDF models in your larger system, import the xacro and link it to the rest of your model, like so:

<?xml version="1.0"?>

<robot xmlns:xacro="http://www.ros.org/wiki/xacro" name="myfirst">

  <xacro:include filename="$(find multisense_description)/urdf/multisenseSL/importable.urdf.xacro"/>

  <link name="base_link">
    <visual>
      <geometry>
        <cylinder length="0.6" radius="0.2"/>
      </geometry>
    </visual>
  </link>

  <xacro:importable_multisenseSL name="multisense" parent="base_link">
    <origin xyz="0 0 1" rpy="0 0 0"/>
  </xacro:importable_multisenseSL>

</robot>

3.4. Configuration

The ROS driver uses dynamic_reconfigure to adjust the LED duty cycle, IMU configuration, and camera parameters.

To bring-up the dynamic reconfigure graphical interface, execute:

rosrun rqt_reconfigure rqt_reconfigure

select the "/multisense" namespace from the drop-down list:

Reconfigure GUI
Figure 1. ROS Dynamic Reconfigure in Noetic, Melodic, Kinetic

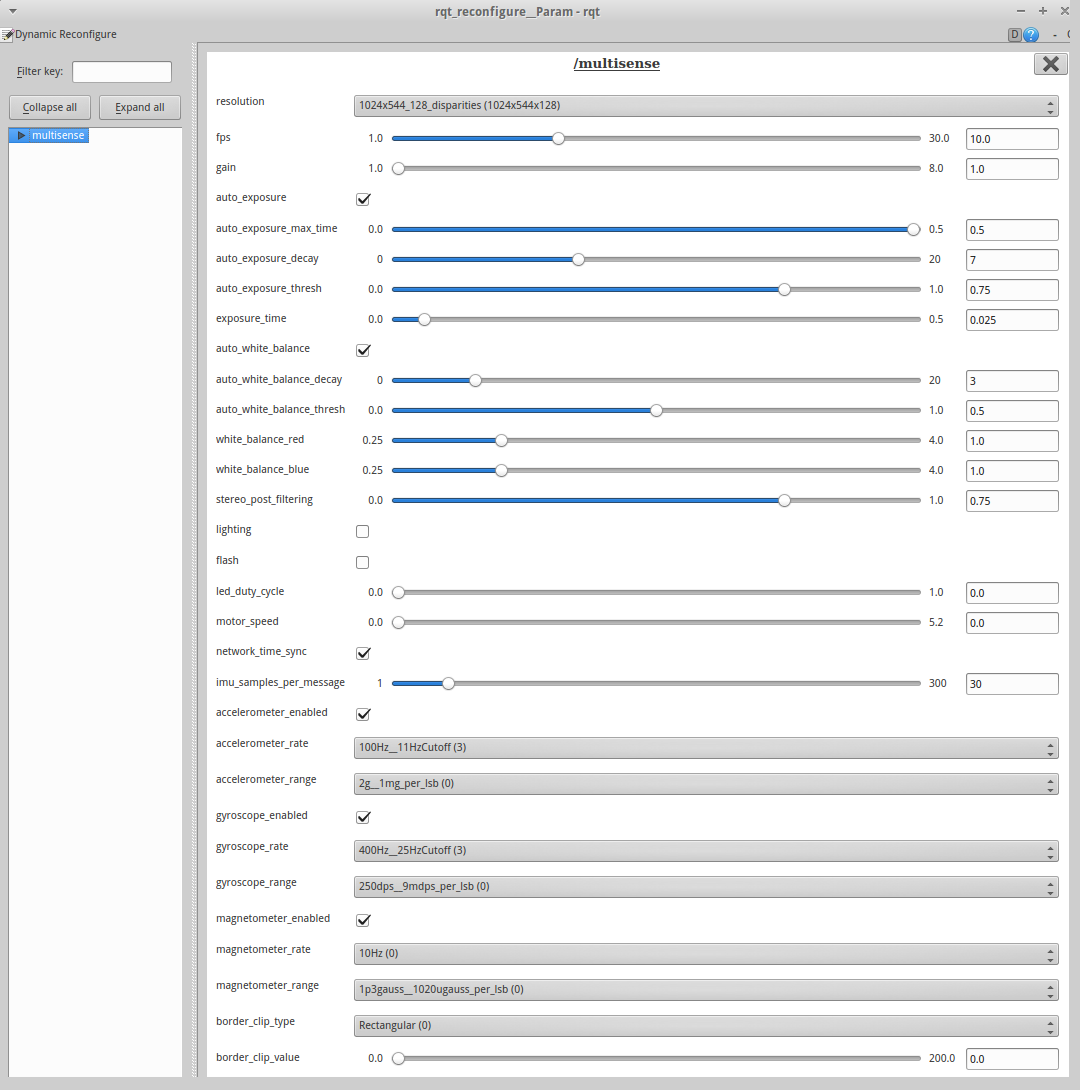
Dynamic reconfigure allows the camera resolution to be changed from 0.5 megapixels (1024x544) up to 2 megapixels (2048x1088). 3.0_beta firmware adds support for non-square vertical resolutions (1024x272 and 2048x544) and varying disparity levels (64, 128, and 256.) Please also note that in the 3.0_beta and newer firmware release, disparity data is available at all resolutions.

When switching resolutions there is a delay in the image streams while the sensor re-computes internal parameters. This delay can be on the order of 30 seconds.
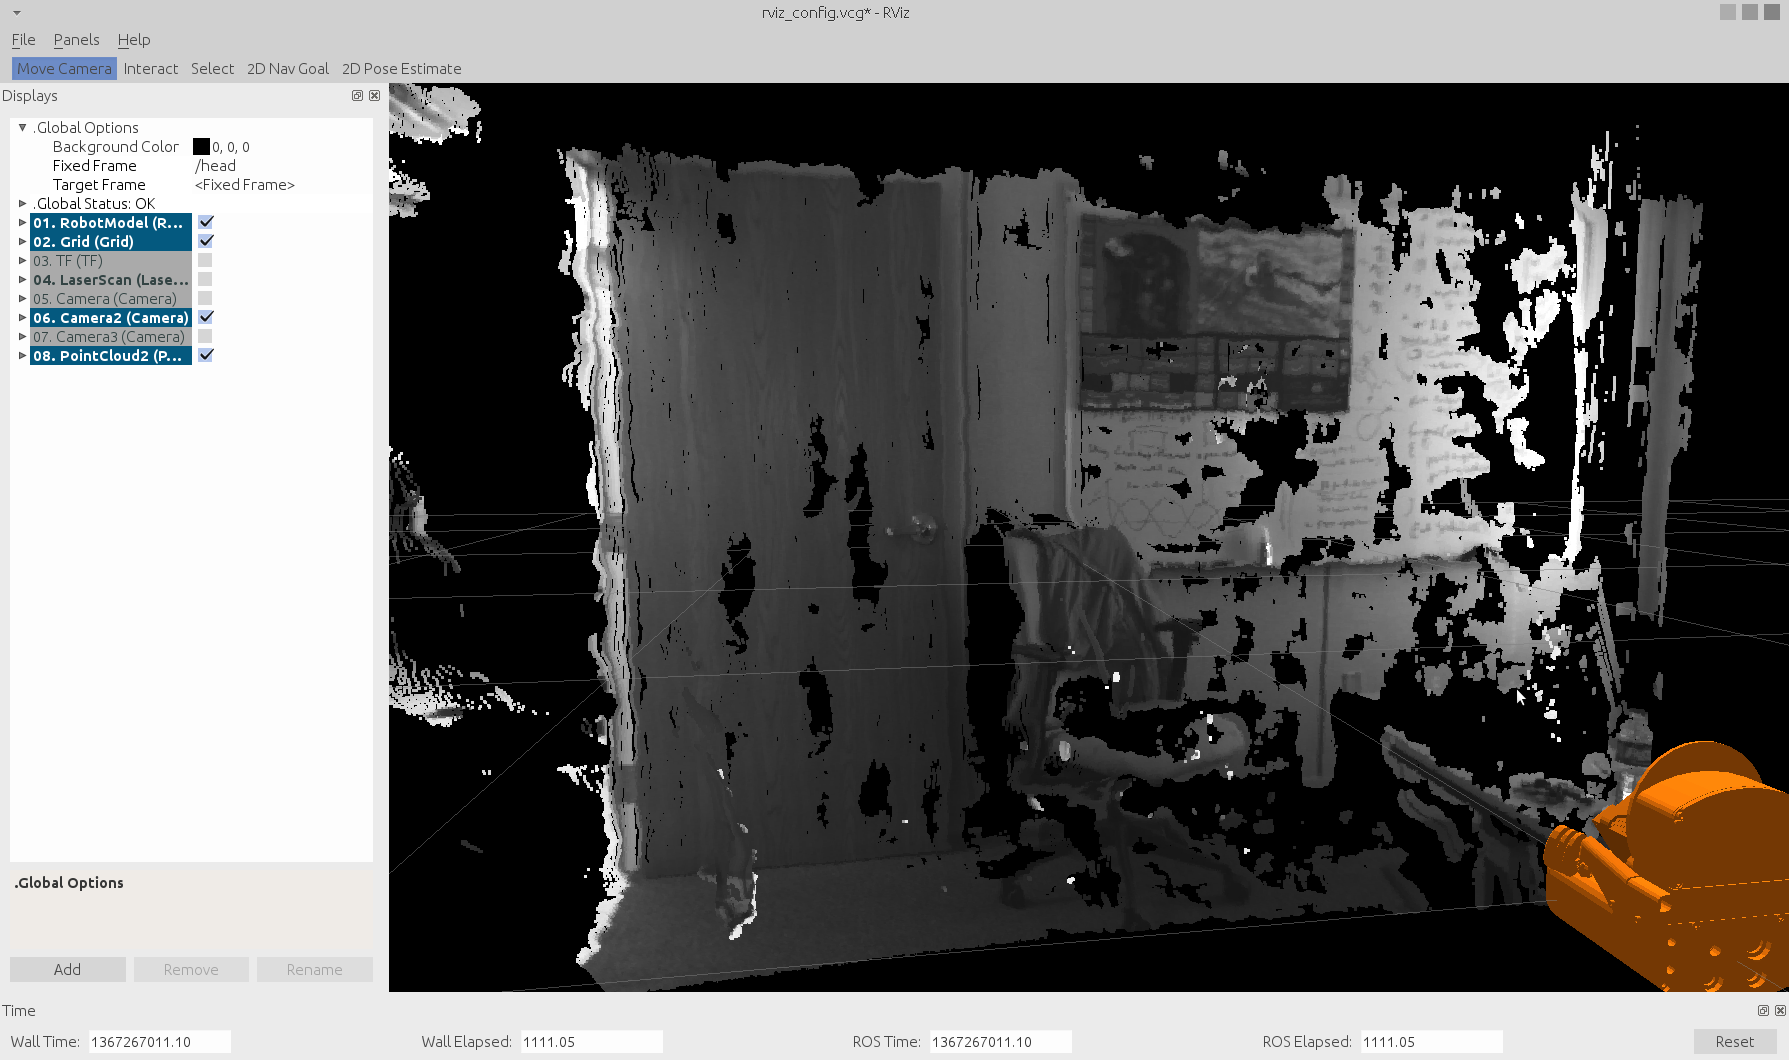
3.5. Visualization

The ROS full install includes a 3D visualization tool called RViz. To start RViz, execute:

rosrun rviz rviz

Once RViz opens, navigate to File → Open Config, and select the file called rviz_config.vcg located in the multisense_bringup package, located in the following directory:

PATH_TO_SOURCE/src/multisense/multisense_bringup

This will load the correct configuration to visualize all sensors on the Multisense S21.

Note that in the default Ubuntu 12.04 desktop, the File menu is not displayed on the RViz window, but rather on the panel at the top of the screen, and is only visible when the mouse hovers over the panel. To access the File menu, move the mouse to the top of the screen, and the menu should appear in the upper- left corner.

RViz
Figure 2. ROS RViz

3.6. Command Line Utilities

The driver contains several command line utilities for querying and setting information stored in non-volatile flash on your MultiSense S21.

The utilities are packaged as part of the low-level C\++ API in the multisense_lib package, and can be run using the rosrun command. For example, to see the built-in help of the IP address changing utility:

rosrun multisense_lib ChangeIpUtility --help
Changing the Network Address

The IP address, gateway, and network mask of the MultiSense S21 can be configured by using the ChangeIpUtility command:

USAGE: ChangeIpUtility [<options>]
Where <options> are:
-a <current_address>   : CURRENT IPV4 address (default=10.66.171.21)
-A <new_address>       : NEW IPV4 address     (default=10.66.171.21)
-G <new_gateway>       : NEW IPV4 gateway     (default=10.66.171.1)
-N <new_netmask>       : NEW IPV4 netmask     (default=255.255.240.)
-y                     : Disable confirmation prompt
-b <network interface> : Network interface to broadcast this IP on

For example, assuming the MultiSense S21’s current IP address is 10.66.171.21, the following command will change the IP address to 10.0.0.100, the gateway to 10.0.0.1, and the network mask to 255.255.255.0.

rosrun multisense_lib ChangeIpUtility -A 10.0.0.100 -G 10.0.0.1 -N 255.255.255.0

If you do not know the current IP address of your MultiSense S21, you can use the -b to broadcast over the specified network interface and ALL MultiSense units on the network segment will their IP addresses changed.

Do not set the IP address of your MultiSense unit to any address between 192.168.0.1 and 192.168.0.255 — that IP block is on the MultiSense SL laser subnet, and conflicts with the assignment of the MultiSense to that subnet. The LWIP interface on the MultiSense will route all the outgoing traffic to the laser rather than the client, making it appear as though the MultiSense is not responding.

Any changes made will only be reflected after the sensor has been power cycled.

When using the -b option you must run this utility as root.

Querying and Changing the Stereo Calibration

The stereo calibration can be queried or changed using the CameraCalUtility command:

USAGE: CameraCalUtility -e <extrinisics_file> -i <intrinsics_file> [<options>]
Where <options> are:
-a <ip_address>     : ip address (default=10.66.171.21)
-s                  : set the calibration (default is query)
-y                  : disable confirmation prompts

The default behavior is to query and store the calibration parameters into the filenames specified.

For example, the following command will query and store the extrinsics and intrinsics into the saved_extrinsics.yml and saved_intrinsics.yml files, respectively. If either of the files already exists, a confirmation prompt will be presented.

rosrun multisense_lib ImageCalUtility -e saved_extrinsics.yml -i saved_intrinsics.yml

To program new calibration parameters into the non-volatile flash on the sensor, use the "-s" option:

rosrun multisense_lib ImageCalUtility -e new_extrinsics.yml -i new_intrinsics.yml -s

Any changes to calibration will be immediately reflected by a query; however, onboard rectification will not see the changes until the sensor has been power cycled.

The utility uses the OpenCV file format for matrix storage, and either YAML or XML formats may be used, determined by the file extension: .yml or .xml, respectively. Example YAML extrinsics and intrinsics files are provided here:

PATH_TO_SOURCE/src/multisense/multisense_lib/sensor_api/source/ImageCalUtility
Querying Device Information

The factory-set device information can be queried by using the DeviceInfoUtility command:

USAGE: DeviceInfoUtility [<options>]

Where <options> are:
-a <ip_address>     : ip address (default=10.66.171.21)
-k <passphrase>     : passphrase for setting device info
-s <file_name>      : set device info from file
-q                  : query device info
-y                  : disable confirmation prompt

For example, assuming the sensors’s current IP address is 10.66.171.21, the following command will query and print the device information to the console. Setting the device information with the "-s" option is not publicly supported.

rosrun multisense_lib DeviceInfoUtility –q
Querying and Changing the IMU Configuration

The IMU configuration can be queried or changed using the ImuConfigUtility command:

USAGE: ImuConfigUtility [<options>]

Where <options> are:
-a <ip_address>     : IPV4 address (default=10.66.171.21)
-q                  : query and report IMU configuration
-f                  : store IMU configuration in non-volatile flash
-s <samples>        : set IMU samples-per-message
-c "<sensor_config>": IMU sensor configuration string

<sensor_config> is of the following form:
    <sensor_name> <enabled> <rate_table_index> <range_table_index>

For example, to enable the accelerometer using rate index 1 and range index 2:
    -c "accelerometer true 1 2"
Multiple "-c" options may be specified to configure more than 1 sensor

For example, assuming the sensor’s current IP address is 10.66.17.21, the following command will change the IMU configuration back to the factory defaults, storing the configuration in non-volatile flash on the sensor head.

rosrun multisense_lib ImuConfigUtility -f -s 30 -c "accelerometer true 3 0" -c "gyroscope true 3 0" -c "magnetometer true 0 0"

The "-q" option will print the current configuration along with detailed information about the possible settings for each sensor type.

The "-s" option will tell the MultiSense unit how many IMU sensor samples to queue internally before sending them over the network. This can be used to make tradeoffs between sample rates, processor load, and latency. Please note that low samples-per-message settings combined with high sample rates may interfere with the acquisition and transmission of image and laser data.

See section 4.5 for information on how the IMU configuration is exposed in the ROS dynamic_reconfigure interface.

Upgrading the Onboard Software

The onboard software can be field upgraded by using the MultiSenseUpdater command:

USAGE: MultiSenseUpdater <ip_address> <update_file>

Where <ip_address> is the sensor's IPV4 address or resolvable hostname, and <update_file> is an official ".slf" package file.

For example, assuming the MultiSense’s IP address is 10.66.171.21, the following command will update the sensor’s firmware to version 3.3.

rosrun multisense_lib MultiSenseUpdater 10.66.171.21 multisense_firmware_v3_3.slf

This utility will print verbose progress information to the console and may query for user input. The update process may take several minutes to complete.

If the firmware update process is not allowed to complete successfully, your MultiSense S21 will be left in a non-functional state. To avoid this:

  • Before running the update command, make sure to close all other software that communicates with the MultiSense (ROS nodes, utilities, etc.)

  • Ensure that the MultiSense unit is on an isolated network and has a stable power source.

  • Do not interrupt the update process once underway.

If the update fails to complete — do NOT power-cycle or power-off the MultiSense S21. Instead, remove all possible networking equipment between the update computer and the MultiSense S21 and restart the firmware updating process.