Linux Host Network Configuration
To connect to the MultiSense with the factory default IP address, the host machine must be configured to have an IP address on the same subnet as the MultiSense. There are many ways to configure a static IP address under Linux, and users are encouraged to use whatever means of IP configuration they are most comfortable with.
This documentation provides both command line and GUI examples for configuring a static IP address for a network interface under Linux. This documentation assumes you have Network Manager installed and running on your system. Network Manager is the default network management application for Ubuntu.
Command Line
Static IP Address
The Network Manager command line interface nmcli can be used to manually set a static IP address for a network interface
General usage for the nmcli tool to configure a static IP address
nmcli con modify <network-interface> ipv4.method manual ipv4.addresses <ip-address>
To query the list of available network interfaces execute
ip addr
The following command would set the IP address of the eth0 network interface to 10.66.161.200 which would allow
the host machine to connect to MultiSense cameras on the 10.66.171 subnet attached to eth0.
nmcli con modify eth0 ipv4.method manual ipv4.addresses 10.66.171.200/24
Note
The /24 is the CIDR notation for a subnet mask of 255.255.255.0. See https://en.wikipedia.org/wiki/Subnet
Run the following command to test if the static IP address for your host machine’s network interface was set properly. This command assumes you set your host machines IP on the 10.66.171 subnet, and the MultiSense has the default IP address of 10.66.171.21
ping 10.66.171.21
MTU
The Network Manager command line interface nmcli can be used to manually set the MTU for a network interface
General usage for the nmcli tool to configure the MTU for a network interface
nmcli connection modify <network-interface> 802-3-ethernet.mtu <mtu>
the following command will set the MTU of the eth0 network interface to 9000 bytes
nmcli connection modify eth0 802-3-ethernet.mtu 9000
Note
Not all network interfaces support Jumbo Frames (i.e. MTU sizes > 1500). This is especially true for USB Ethernet dongles, and small embedded computers with ethernet controllers connected over USB.
Run the following command to test if the MTU of your network interface is properly configured. This command assumes the network interface connected to the camera is configured with a MTU of 9000 bytes, and the MultiSense has the default IP address of 10.66.171.21
ping -s 8992 10.66.171.21
Note
ping -s adds an extra 8 bytes of ICMP data. Ensure you subtract these 8 bytes from your configured MTU size when testing with ping
UDP Receive Buffers
To permanently set the UDP buffer receive size on Linux add the following lines to /etc/sysctl.conf
net.core.rmem_max=16777215
net.core.rmem_default=16777215
Note
You will most likely need modify /etc/sysctl.conf as root
Once /etc/sysctl.conf has been updated, reboot your machine for the changes to take effect
The following command can be used to query the current UDP buffer size settings on the host machine
sysctl net.core.rmem_max
sysctl net.core.rmem_default
GUI
The Network Manager GUI can be used to manually set both a static IP address and a custom MTU.
To add a new network interface profile navigate to the Network page of the Ubuntu Settings application. Select the +
button next to the network interface where the MultiSense is attached. If there is only one wired network interface,
Ubuntu will label it as Wired`

MTU
On the Identity tab of the new wired network interface profile, manually enter the desired MTU setting for the interface.
It is recommend to use the largest possible MTU supported by your network interface card. For builtin PCIe-based network
interface cards, this is usually 9000 bytes. For USB Ethernet dongles, the largest MTU size may be smaller.
For convenience, you may also want to change the name of the profile to something which indicates it’s intended to connect to a MultiSense.

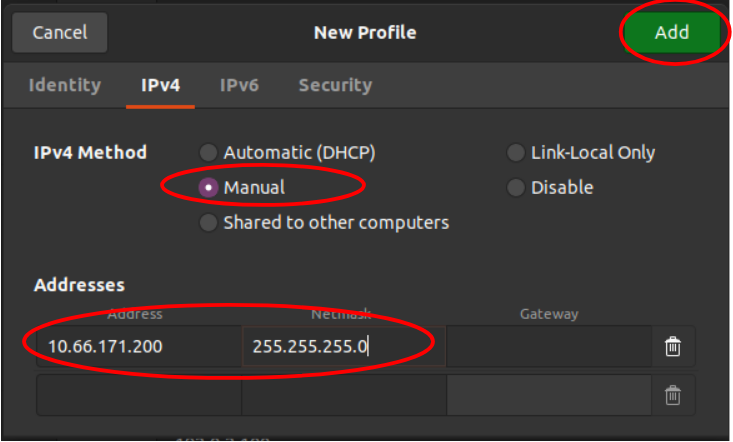
Static IP Address
On the IPv4 tab of the new wired network interface profile select a Manual IP configuration, and manually enter
the desired static IP address, subnet mask.
Once a valid IP address and subnet mask have been entered press the green Add button to create the new network interface
profile.
From the Network page of the Settings application, click on the new network interfaces profile and wait for a
checkbox to appear next to the profile. Once the checkbox appears, the profile is active. If the checkbox does not appear
it usually indicates no devices are connected to the interface. Ensure the camera has power, and is plugged into the correct
network interface.
Run the following command in a terminal to test if the MTU and static IP of your network interface is properly configured. This command assumes the network interface connected to the camera is configured with a MTU of 9000 bytes, and the MultiSense has the default IP address of 10.66.171.21
ping -s 8992 10.66.171.21